

It’s easy to forget to maintain our home security systems. After all, they perform all their main functions by themselves, and the incredible self-sufficiency of a security system makes it easy to neglect the basic needs of a system.
Unfortunately, for many home security system owners, it’s not always clear what the systems require. You don’t want to waste your time attending to something that doesn’t need attention, but you also want to avoid overlooking necessary upkeep.
We sympathize with the confusion common to many security system owners. It’s not easy knowing the dos and don’ts of home security system maintenance. To help simplify the process, we’ve put together these security system maintenance tips to help you quickly and efficiently perform basic maintenance on your system.
Home Security Maintenance Habits
The hectic distractions of modern life make it hard to devote time to performing the basic checks and cleaning your system requires. After you learn all the necessary tricks of system maintenance, we recommend allocating one day per month or per week, depending on the task, to performing these chores. Decide on a system of checks and remember to repeat your routine. Frequent checking and cleaning represent your best line of defense against your system underperforming and wearing out prematurely.
Don’t worry — all these security system maintenance tips don’t take long to perform. They’re also all easy to do, and in no time, you’ll be a pro at providing your system with the necessary maintenance it requires to perform at its best.
Here is a rundown of what you need to know about your home security system’s maintenance:
- Perimeter Checks
The area around your house counts as your perimeter. Performing a basic inspection of all the perimeter features of your security system represents the most basic maintenance task we’ll cover. Just go around making sure everything works — simple.
Start with the locks of each door and window. Ensure the window or door is securely locked and doesn’t move when you attempt to open it. Also, inspect the edge of the door or window. If you see any rot or cracks, take note. These seemingly minor examples of property damage don’t stay insignificant for long. It’s only inevitable for these cracks to grow and compromise both the structural integrity of your house and your security system’s efficacy.
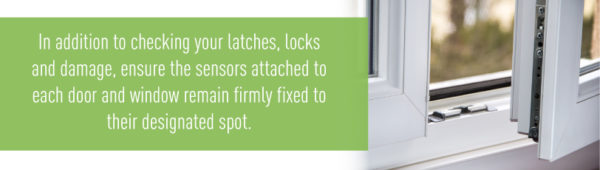
In addition to checking your latches, locks and damage, ensure the sensors attached to each door and window remain firmly fixed to their designated spot.
- Check Your Control Panel
Your control panel acts as the central nervous system for the security system. Each aspect of your home’s security functions get directed through this panel. Moreover, this panel allows you total access to monitor the readouts of every sensor situated throughout your house. Naturally, it’s vital for this control panel operate correctly. It’s advisable to perform occasional tests on your system to ensure no part became disconnected or appears to experience any perceivable malfunction.

Thankfully, it’s simple to test your panel. Most home security system panels come with a test mode, so just activate this mode to run a test. If your system relies on monitoring from your security company, inform them of your intention to run the test. Otherwise, they’ll mistake your test for an anomaly in your system or even a possible break-in.
- Book Yearly Examinations
In the rest of this guide we’ll cover a bunch of practices any homeowner can perform, but there are some things you need a professional to check. Not only does it help to have another set of eyes check out your system every year, but an on-site expert can perform tests and tune-ups you can’t do easily.

A security system specialist runs a full test and examination of your system’s functionality. If any glitches or anomalies exist, the security system technician will catch them.
It’s also important to have a professional perform visual checks. These include aspects like confirming your security camera wiring hasn’t deteriorated or malfunctioned, or that your cameras haven’t been knocked off target. Everything from the control panel to smoke alarms, an expert will go over. Put your mind at rest once a year. Plus, we’re sure you’ll get a nod from a pro for the awesome job you’re doing maintaining your own system.
At Lloyd security, we offer free annual inspections for our customers. Contact us today for more information on our free inspections!
- Smoke Detector Maintenance
We’re all familiar with noisy smoke alarms. It’s easy to curse out a pesky smoke alarm for screaming about something or other. Maybe it’s new batteries they need. Maybe they detect something that isn’t there, or maybe they’re just plain malfunctioning.
It’s often an inviting notion to simply slap a shrieking smoke alarm silent. This Band-Aid solution doesn’t get at the heart of the matter, though — your smoke alarm needs maintenance.
Loud smoke detectors force you to act, but even if your alarm isn’t making noise to get your attention, it’s smart to inspect regularly. This falls under one of the National Fire Protection Association’s (NFPA) several best practices.
How do you check your smoke detectors? It’s very easy to do:
- Alert Your Family. Let everyone in the house know you’re performing a test of the alarms. No need to cause an undue panic. You’ll also need earplugs — it’s loud, and there’s no need to potentially damage your hearing. Play it safe.

Another factor to consider concerns your home security system. If your smoke alarms connect to your security system, then call your security system company and inform them of your test. Otherwise, you’ll trigger a false alarm.
If your alarms exist separately from your security system, then disregard this step. However, it’s a good idea to connect your detectors to your system. This ensures your house possesses another line of defense against a possible fire. As you’ll see in the next section of your maintenance test, you don’t always hear an alarm way down the hall. Don’t rely on your nighttime hearing to alert you in the event of a fire — hook your detectors up to a security system.
- Enlist Hearing Assistants. Since your family members, and your alarm company, know of your intentions to conduct a test, why not let your family lend a hand — or rather, an ear. Position an assistant down the hallway, or on the opposite end of the house, from a given detector. As you test each alarm, check in with your distant helper to ensure your alarms dispense a functionally loud call. It’s vital you hear a smoke alarm go off, regardless of its place in your house. If your assistant cannot hear the alarm, then make arrangements to install another, louder smoke alarm, at that location.
Quiet smoke alarms also occasionally indicate that their batteries are low. Often, when an alarm’s batteries get low, they begin to chirp. However, if they are completely worn out, they may not warn you. That’s why this test is important — it determines the health of the battery and of the alarm itself.
- Test Time. It’s time to push the button and test your alarm. First, locate the button on either the side or center of the alarm. Use a stable chair, step ladder or broom handle to access the button. Brace yourself for the trademark high-pitched noise — if all goes well. If you don’t hear the alarm sound, then try replacing the battery.
If your alarm is hardwired to your security system, and your alarm doesn’t sound despite the indication light being illuminated, contact your security company immediately. Arrange for them to investigate the status of the alarm. If their system doesn’t indicate anything wrong, then there’s a serious problem with your alarm. Your company needs to attend to this problem.
- Smoke Test. Next you’ll need to test your alarm’s actual smoke sensory capacity. Light a small group of matches and let them burn for a moment. Position them several feet below the smoke alarm, and blow them out to produce smoke. Once the alarm detects the smoke, it should sound. Simply press the test button to silence the alarm.
If you desire, use a vacuum hose extension to suck up any smoke left over after the test. Now perform the same test for each alarm in your house.
- Record the Date. Try to test your smoke alarms every month, maybe on the first of each month. In any case, work this monthly task into your schedule. Set a reminder using your calendar app on your smart phone, put it on the to-do board, anything to remember. It’s important to properly maintain your smoke alarms as part of your overall security system maintenance checks.
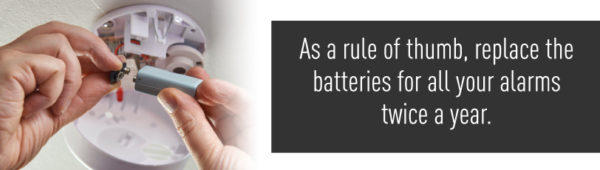
- Replace the Batteries. As a rule of thumb, replace the batteries for all your alarms twice a year. Even if you’re checking your detectors regularly, it’s common for the batteries to die suddenly without you noticing.
- Replace Your Smoke Alarms. It’s wise to replace all your smoke alarms every ten years. Despite their functional appearance, smoke alarms drastically lose their reliability as they age. After a decade, you simply cannot rely on them anymore.
If you’re unsure as to age of your alarm, simply check the back of the unit to locate the date in which the alarm was made. If your smoke alarms are integrated with your security system, alert your security provider before attempting to remove the alarm. Your provider might possess more information concerning your alarms than you, especially if they originally installed them. Perhaps your smoke detectors fall under your product warranty.
- Clean Your Detectors. Another important practice to follow in maintaining your smoke alarms involves regular cleaning. There’s several openings in a typical smoke alarm. During the course of a month, these holes begin to accumulate debris and dust. If left unattended, this gunk piles up and prevents the smooth flow of air throughout the unit. In the event of a fire, your clogged smoke alarm won’t sound.
Thankfully, it’s incredibly easy to prevent this scenario: Clean your alarms. Try to clean your smoke detectors either during your monthly alarm test routine or your weekly dusting regimen. It often doesn’t take more than a quick dusting to effectively clean your alarms. If dusting isn’t your thing, try using a vacuum hose extension or delicate cloth. Make sure you devote particular attention to cleaning the slats and smoke sensor.
Security Cameras
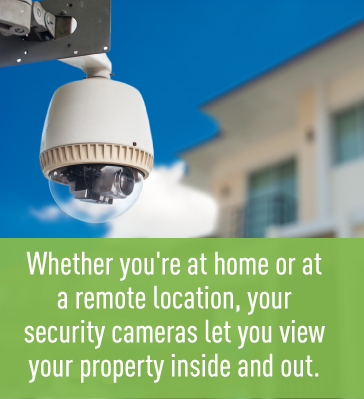
Your security cameras act as your eyes on the ground. Whether you’re at home or at a remote location, your security cameras let you view your property inside and out. We don’t need to stress the importance of their role within your integrated security system. Not only do your cameras allow you to assess a situation at your house, but they also allow you to record any event you need to review.
If you let your camera’s lenses get dirty, it greatly diminishes their effectiveness. Filthy camera lenses might even prevent proper visual identification of a criminal in the event of a break-in. Your cameras stand as a major part of your system’s effectiveness. Therefore, it pays to keep them clean — literally.
In addition to performing a vital job, your security cameras are among the more expensive devices associated with a typical home security system. By letting the weather wear them down, you’re risking the unnecessary cost of replacement. It only takes a quick regular cleaning to effectively prolong the life of your cameras, but it’s not just residues from the weather you need to worry about.
Lots of possible threats to your cameras safety exist. After all, they’re exposed to the elements, not to mention pests. Certain animals, like birds, rats, insects, spiders, all seem attracted to your system’s wires. Occasionally, some birds or rodents attempt to pry loose wires or other mechanical elements of the cameras. Cold temperatures also might prompt little critters to crawl into the warm circuitry of your cameras. A regular check while cleaning ensures no unwanted houseguests appear interested in setting up shop in your camera or trying to steal any wiring.
As for insects, frequent cleaning ensures no undesired insect presence occurs. For example, it’s not uncommon for a spider to build a web right overtop a cameras lenses. Don’t let an itsy bitsy spider cause a giant problem for your camera. Clean now, and your camera will thank you for years to come.
Cleaning Security Cameras

It’s also important to properly clean your cameras — not just any process or cleaner will do. First, consider the safety of your cameras while you clean them. Camera lenses scratch easily and don’t come cheap to replace. Knowing the right techniques to clean your cameras will prevent any accidental damage.
Here’s a quick look at how to clean your security cameras:
- Shut off the Power
Before you do anything, cut the electricity going to the system. It’s not safe to be poking around with a rag with the power still active.
You’ll likely need to contact your security system company to let them know your intentions, too. Your system won’t be off line for long, but let them know in advance.
- Bust out the Ladder
You need a trustworthy ladder for this job. Jumping up and down with a cloth taped to the end of a broom handle won’t work.
Enlist the aid of a friend of family member to steady your ladder and give you any additional help. For each camera, position your ladder on even, stable ground and ascend slowly and with caution.
- Unleash the Aerosol Air

Sometimes with a delicate surface like a camera lens, it can be ideal to use a high-powered aerosol can filled with air rather than trying to clean it with a cloth. A few blasts of clean aerosol air instantly remove most dust or dirt from the lens. If you require further air, blast away.
Just be careful about sustaining the aerosol air against the lens for too long. The air emitted is incredibly cold, and prolonged exposure might damage the lens.
- Wipe With Microfiber
Microfiber cloths make a big difference in both their quality of work and reduced risk of scratching the lens. After brushing away and remaining detritus from the lens, apply a little lens cleaner solution — if you have some. Lens cleaner can be purchased from any optical store. It’s an excellent product to use because it doesn’t leave any residues on the lens. Such unwanted leftover streaks or smudges can cloud the lens reducing its vision.
If you don’t have lens cleaner, just exhale on the lens and wipe away the moisture with your microfiber cloth. It will have generally the same effect.
- Clean the Body of the Camera
For this step, a simple dish rag will work. Just moisten the rag and wipe down the exterior of the camera housing unit. Clean the wires — again, make sure the system isn’t receiving power — as well as underneath and on top of the camera.
Apply the same steps to each camera you use on your property. It’s wise to clean all your cameras at least once a month, or more frequently, following a major weather event. Even residue from rain water can cloud up a lens and make it increasingly difficult to clean if left alone.
Keeping Your System in Tip-Top Shape
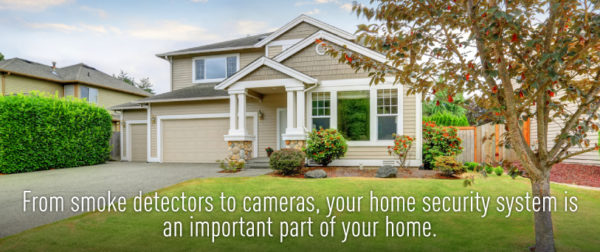
From smoke detectors to cameras, your home security system is an important part of your home. For it to operate efficiently and effectively, it needs some regular maintenance.
And, when you want a reliable residential security system in Minnesota, trust the experts at Lloyd Security. We can help ensure your home and your property stay protected. For more information on home security systems and what you can do to keep them functioning at their peak, contact us today for a free annual security inspection.